
The old adage "measure twice, cut once" only scratches the surface of accurate woodworking. Consistent, repeatable measurement and layout are what separate work that fits together cleanly from projects plagued by gaps and misalignment. Mastering these techniques is the single biggest upgrade most woodworkers can make.
Choose the Right Tools
A quality combination square, a marking gauge, a sharp marking knife, and a reliable tape measure form the core layout kit. A marking knife scores a far finer, more accurate line than a pencil, and that scored line also gives your chisel or saw a precise place to register.
Work From a Single Reference
Whenever possible, measure and mark all parts from one reference face and one reference edge. This avoids compounding small errors across a project. Marking matching parts together — for example, clamping two boards and squaring lines across both at once — guarantees they end up identical.
Story Sticks and Relative Measurement
Skip the ruler when you can. A story stick records key dimensions directly from the project itself, eliminating reading errors. Likewise, fitting a part to the actual opening rather than to a number on a tape almost always produces a tighter result. Relative measurement beats absolute measurement in real-world joinery.
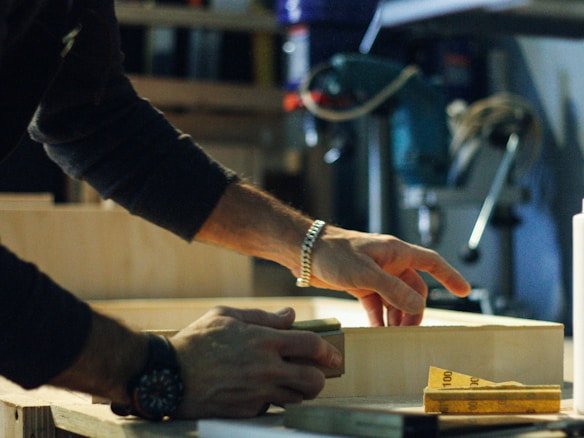
Account for the Saw Kerf
Every cut removes material equal to the blade's kerf. Always mark which side of the line is waste and cut on the waste side, leaving your scored line intact. Internalizing this habit prevents the cumulative shortfall that ruins otherwise careful work.
Precise measurement is a skill that compounds: the more disciplined your layout, the easier every joint, assembly, and finish becomes.
Essential Measuring and Marking Tools
Accuracy starts with the right kit. A quality combination square checks both 90 and 45 degree angles and doubles as a depth gauge. A marking gauge scribes a consistent line parallel to an edge, and a marking knife scores a far finer, more accurate line than any pencil. Add a reliable tape measure, a steel rule for short measurements, and a sliding bevel for transferring angles. These few tools cover the vast majority of layout tasks.
Why a Marking Knife Beats a Pencil
A pencil line has width, and that width is enough to ruin a tight joint. A marking knife severs the wood fibers exactly where the cut should fall, leaving a crisp line you can drop a chisel or saw into. The scored line also prevents tear-out on the waste side. For joinery, switching from pencil to knife is one of the single biggest accuracy upgrades available.
Work From a Single Reference Face
Whenever possible, measure and mark every part from one reference face and one reference edge, marked with a pencil swirl so you never lose track. This prevents small errors from compounding across a project. When parts must match, mark them together: clamp two boards side by side and square your lines across both at once so they end up identical.
Story Sticks and Relative Measurement
Skip the ruler when you can. A story stick records key dimensions directly from the project, eliminating the reading errors that creep in every time you consult a tape. Likewise, fitting a part to the actual opening rather than to a number almost always produces a tighter result. In real-world joinery, relative measurement beats absolute measurement.
Account for the Saw Kerf
Every cut removes material equal to the blade's kerf, usually around 3mm. Always mark which side of the line is waste and cut on the waste side, leaving your scored line intact. Internalizing this habit prevents the cumulative shortfall that quietly ruins otherwise careful work.
Frequently Asked Questions
What is the most important measuring tool in woodworking?
The combination square is the most versatile, handling square layout, 45 degree angles, depth checks, and marking. Paired with a marking knife, it covers most layout needs accurately.
Why do my joints come out slightly off even when I measure carefully?
The usual culprits are measuring from different reference faces, using a pencil instead of a knife, and forgetting the saw kerf. Standardize on one reference face, mark with a knife, and always cut on the waste side.
Want the complete plans and step-by-step training?
Get instant access to thousands of detailed woodworking projects.
Join The Training